iPod - PC - TV
If you have found yourself here at this blog and have an iPod or are contemplating buying on then do yourself a favour and read this from start to finish. I am sure you will learn something or some things as I did.
My main reason for buying an iPod Video 60GB a couple of months ago was for entertainment when alone traveling or on a job site somewhere in the world. My original idea was to be able to fill it up with music and a few movies (dvd's?). I really had done no research whatsoever so when I arrived at the iPod shop I bought the unit itself, extended warranty and a silicone case. I went black as pictured below. (beautiful isn't it?)
I had no idea of it's full potential!! I must say that it's very impressive!!
So, the following ramble is split up into these sections:
1. The Original Setup
2. The FM transmitter
3. Adding Podcasts
4. Adding Photos
5. Adding Videos
6. Connecting your TV (I left the best till last)
1. The Original Setup
This is all pretty basic so most of you will just need to follow the instructions that comes with your iPod unless you want to do something special with your configuration.
Anyway I started by installing iTunes and adding all my music that accounted for about 10GB. I suggest that you use iTunes to copy your CD's onto your PC and that you configure iTunes to burn music in MP3 format.
Make sure that you sure connected to the Internet and when you enter a music CD then iTunes will then look for a database to import all song names and album artwork BEFORE you burn it.
2. The FM transmitter
After a few days of using the iPod I thought that I would check out the Apple Store to see what accessories are available. The first one to catch my eye was an iTrip FM transmitter pictured below that just clicks on to your iPod and allows you to tune any radio in to a selected frequency on the iTrip.
Now just think about that!! No need for a CD stacker because the iPod IS your CD stacker. My 10GB of music is well over 2,000 songs. So obviously I bought one.
Most important is to firstly check for an unused frequency on your radio and then tune in the iTrip to EXACTLY that frequency.
3. Adding Podcasts
Podcasts come in 2 forms, audio only and audio/video. I have subscribed to about 10 but there are thousands out there to be found. A couple of my favourites are:
And
More about this in section 6. Connecting your TV.
4. Adding Photos
Don't forget to put all your digital photos on your iPod either. You can configure iTunes to be manually or automatically updated. Your complete photo album in you pocket. More about this in section 6. Connecting your TV.
5. Adding Videos
This is the tough one. Videos will play in MP4, MOV or M4V formats so whatever you have got that is not in one of these formats then you need to encode. I have tried quite a few transcoder programs and the best so far is:![]() It is the fastest of the transcoders that I've tried, creates the smallest files, has less
It is the fastest of the transcoders that I've tried, creates the smallest files, has less
sound to image latency and is easier on your CPU. It also has a predefined configuration for the iPod called "Digital Media Player" that sets up all parameters, etc to output the file into MP4 video format. So far I have transcoded the DVD format VOB, the Flash format FLV (YouTube for example), AVI, MPG, DAT and a few others. Just drag the file or files into the main window and click start. Once complete then just add the folder into iTunes and the next Sync with your iPod will add the videos.
6. Connecting your TV
This is by far the best iPod feature that I was not aware of. I was checking out the Apple iTunes store for iPod accessories and noticed the Apple AV Cable for US$19 (AU$29).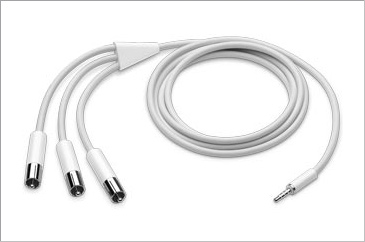
This started my curiosity as here in Brazil the iPod and accessories are ridiculously expensive and I did not want to buy something that I would not use. So I thought that I would try my camcorder cable and found that the only difference is that a standard camcorder cable has the Video and Right Sound cable crossed over.
Tahdah!!!
I have a cable that works and I didn't pay a cent. Just connect it up to one of your TV's AV inputs. Most TV's these days have a connection in the front so it is so easy. You will have to set your iPod up to either PAL or NTSC output in the video settings. You may need to tinker a bit with the iPod setup but, don't worry, it works. By that way, I bought an extra camcorder cable here in Brazil for US$3 (AU$4).
So, now you might start to realize the possibilities. Instead of showing your photos to friends and relatives hunched around a computer you can now sit back in your lounge room and see your photos on your TV. Add some music or a playlist if you like to be played whilst running a slideshow.
Convert your DVD's before you go on a road trip, pack up your iPod and AV cable and plug it in to the TV in your hotel room.
Play your iPod music through your TV if you don't have external speakers.
Save your favorite YouTube clips and play them back on your TV.
Play your Podcasts on TV.
Etc, etc, etc, etc.
All good stuff.
I must say that the Apple AV Connection Kit looks very nice with a docking station and a remote. When I get back to Australia next that will be the first thing I buy.


No comments:
Post a Comment